This post originated from an RSS feed registered with Python Buzz
by Aaron Brady.
Original Post: LindyPi Build- Hardware
Feed Title: insom.me.uk
Feed URL: http://feeds2.feedburner.com/insommeuk
Feed Description: Posts related to using Python. Some tricks and tips, observations, hacks, and the Brand New Things.
Like many nerds, I have a server at home. It stays on around the clock and
provides some basic services to my network: DNS, DLNA streaming, backup and
somewhere to run the odd script or check a website from outside of the office
network.
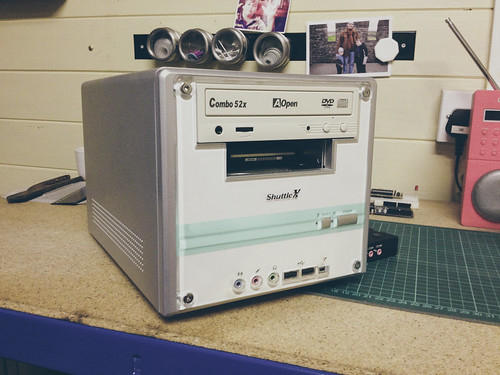
My server was a 2006-era Shuttle with a 60Gb laptop boot drive and a 1.5Tb
Western Digital Green Edition drive.
Nice as this was (and free, as it was ex-work and surplus to requirements) it
had two major flaws: it’s very loud (the fans on Shuttles are notorious) and it
uses 80W of electricity. The server was in my Under-Stair-Data-Centre (USDC),
and at night you could hear it through the stairs, which was a little
unnerving. As per Anthony
Stanford-Clark,
electricity costs (about) £1 per Watt per year, so any replacement
which cost less than that would pay for itself in the first year!
I knew that a Raspberry Pi plus some more parts I already had (or which were
unwanted) would do the job just as well. In order to bring the same level of
isolation between the jobs the server does I had to resort to fairly low-level
software trickery, but I’ll cover that in the next post.
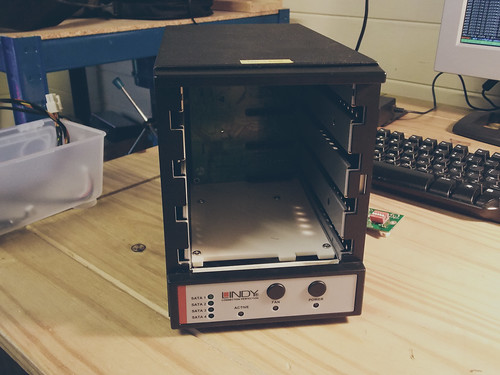
I started with the chassis of a four-port SATA to USB external enclosure. The
enclosure had failed for some undiagnosed reason (lights came on, it spoke USB,
never showed any drives connected), so I couldn’t reuse the controller board
(which was have been really handy).
It did still have a perfectly good and quiet power supply, which was capable
of operating with the fan off, and had easily accessible 12V and 5V rails, as
well as enough room inside for a Raspberry Pi and a 3.5” HDD.
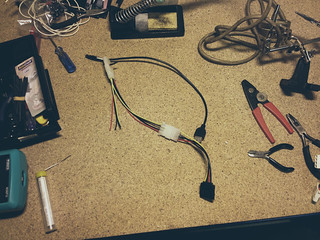
Sadly, the first thing that I did turns out not to have been neccessary. I made
a USB socket to Molex 8981
connector, so that I could
provide the 5V to the Pi’s
micro-USB port. For this I cut a USB extension lead in half, and soldered the
red (5V) and black (ground) to pins 4 and 3 respectively of a Molex pass-through.
This had originally been designed for a 12V fan, hence the cut-off red and black
wires poking out of the top. Naturally, if you connected the USB to this, you
would feed 12V to the Pi and probably let the magic smoke out of it, consigning
it to the bin.
If I were doing this again, I would simply connect the 5V via the P1 header on
the Pi, which has pins for 5V and ground at pins 2 and 6. A PC motherboard fan
header is the same pitch the P1 of the Pi, so if you have a spare fan to sacrifice:
(Adding to the colour confusion: if you re-use a PC motherboard fan connector,
you need 5V on black and ground on yellow, leaving red unconnected. Please
double and triple check this yourself, and don’t blame me if you follow these
instructions and melt your Pi.)
The PSU has an odd connector I’ve not seen before, and I didn’t have a male
part, so I cut one of each of 5V, 12V and ground, and tucked the connector
safely under the fan.
Now I needed to join the Molex Y cable (which has a very boring Molex to SATA
power adaptor by this point), so I cut off a spare connector and use some
terminal block.
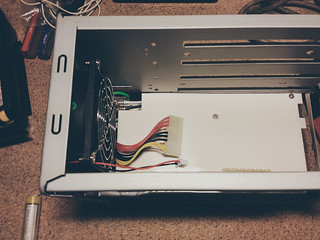
I put the USB to SATA adaptor, HDD, Raspberry Pi and all the leads in place, to
check that there’s really enough room:
Just.
Now there were three bits of hardware work to give the build a proper finish.
I’m sad to admit I’ve not adequately done any of these.
Wire the LEDs from the front panel up so they can be driven from GPIO:
I worked out the pin outs, but didn’t follow this through, because the server
is sitting in the dark under my stairs.
Cut some nice mesh to cover the front of the enclosure:
(Measure twice, cut once: this is too short). I have another piece for when I
get around to the final thing I have not yet done.
Fitting a female RJ45 on the back of the case:
At the moment, there’s a 0.5m RJ45 patch lead poking out of a hole in the back.
The right part is on order from eBay though, so I may get back around to this.
I’m happy with my decision to leave the fan unconnected. latexmallard from
Instructables is running a Pi in a reused case and has taken some thermographic
images,
showing that with no cooling the Pi should operate 11C above the
ambient temperature, which is abundantly safe. (He’s also incorporated a
UPS using a DC-DC convertor, so his Instructable is probably worth a read
if you’re interested).
Finally, here’s a picture of the server in place, serving our streaming and
backup needs. It only draws 15W and is saving us over £60 a year. Though
£40 of year one just went on buying a Raspberry Pi and some metal mesh.