
How to Run the Simple Example Included with the Distribution
Suites, select and run JUnit
TestCases, and edit and save recipe files.
Artima SuiteRunner is a free open source testing toolkit for Java released under the Open Software License. You can use this tool with JUnit to run existing JUnit test suites, or standalone to create unit and conformance tests for Java APIs. To get you up and running quickly, the Artima SuiteRunner distribution ZIP file includes a simple example. This article uses the example to introduce the main features of Artima SuiteRunner. This article will show you how to start Artima SuiteRunner using a recipe file, debug a failed test, select and run Suites, select and run JUnit TestCases, and edit and save recipe files.
When you unzip the Artima SuiteRunner distribution ZIP file, you get the following items:
| Name | Contents |
|---|---|
account.srj |
Recipe file for the example |
accountjunit.srj |
Recipe file for the JUnit example (Added in 1.0beta4) |
example |
Directory of Java source and class files for the example |
javadoc |
Directory containing Javadoc documentation for the API |
README.txt |
The obligatory README file |
suiterunner-[release].jar |
Artima SuiteRunner executable JAR file |
suiterunner-[release]-src.zip |
ZIP file of Artima SuiteRunner source code |
xmlreporter.srj |
Recipe file for the XMLReporter example (Added in 1.0beta5) |
Artima SuiteRunner's executable JAR file is suiterunner-[release].jar. The source and class files for the example are found in the example directory. A recipe file that runs the example is contained in account.srj.
Starting the Graphical User Interface
This article shows screenshots of Artima SuiteRunner version 1.0beta2, as it appeared on Mac OS X. You can run the Artima SuiteRunner example in several ways, the simplest of which is:
java -jar suiterunner-[release].jar account.srj
When you type the previous command, you should see:
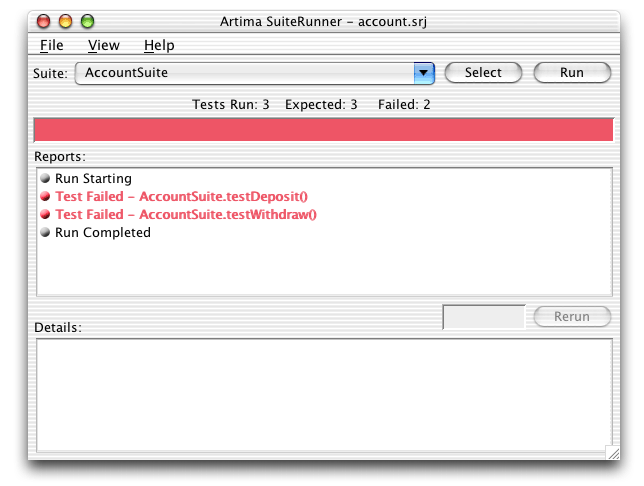
Figure 1. The GUI lists two failed tests.
Artima SuiteRunner's main Graphical User Interface (GUI) is comprised of:
- A "Suite" combo box that keeps a history of the last five suites you've run so you can quickly select one of them to run again
- A "Run" button that causes the suite currently displayed in the Suite combo box to run.
- A "Select" button that pops up a dialog box that lists and lets you select and run any
Suites (or JUnitTestCases) available on the runpath and class path. - A status panel that indicates the number of tests expected, run, and failed.
- A progress bar that indicates the progress of a run as the run executes. The progress bar starts out green. As soon as any error is encountered, the progress bar turns red.
- A "Reports" list box that displays reports generated by the run.
- A "Details" text area that displays details of the currently selected report in the Reports list.
- A "Rerun" button that causes the test, suite, or other entity currently selected in the Reports list to be run again.
Understanding the Recipe File
In the following command, the first and only argument to the Artima SuiteRunner executable JAR file is the name of a recipe file,account.srj:
java -jar suiterunner-[release].jar account.srj
A recipe file is a Java properties file that supplies information needed by Artima SuiteRunner to run a suite of tests. Recipe files contain values for three properties: org.suiterunner.Runpath, org.suiterunner.Suites, and org.suiterunner.Reporters. The contents of account.srj are:
org.suiterunner.Runpath=-p "example"
org.suiterunner.Suites=-s com.artima.examples.account.ex6test.AccountSuite
org.suiterunner.Reporters=-g
In account.srj:
- The value of
org.suiterunner.Runpath(-p "example") specifies a runpath with a single directory,example. - The value of
org.suiterunner.Suites(-s com.artima.examples.account.ex6test.AccountSuite) indicates Artima SuiteRunner should load the specified class, a subclass oforg.suiterunner.Suite, and invoke itsexecutemethod. - The value of
org.suiterunner.Reporters(-g) indicates that Artima SuiteRunner will display its graphical user interface (GUI) and show the results of the run there.
When invoked via the previous command that specifies account.srj as a command line parameter, Artima SuiteRunner will:
- Create a
URLClassLoaderthat can load classes from theexampledirectory, the directory specified via the recipe file'sorg.suiterunner.Runpathproperty. - Via the
URLClassLoader, load classcom.artima.examples.account.ex6test.AccountSuite, the class specified in via the recipe file'sorg.suiterunner.Suitesproperty. - Discover that
com.artima.examples.account.ex6test.AccountSuiteclass is a subclass oforg.suiterunner.Suite. - Instantiate
com.artima.examples.account.ex6test.AccountSuite. - Run the suite of tests by invoking
executeon thecom.artima.examples.account.ex6test.AccountSuiteinstance. - Report test results via the graphical reporter, the reporter specified via the recipe file's
org.suiterunner.Reportersproperty.
Debugging a Failed Test
The glaring red progress bar seen in Figure 1 indicates that some insidious bug or bugs in the account example caused two tests to fail. To find out more about a report, select the item in the Reports list. Details of that report will show up in the Details text area:
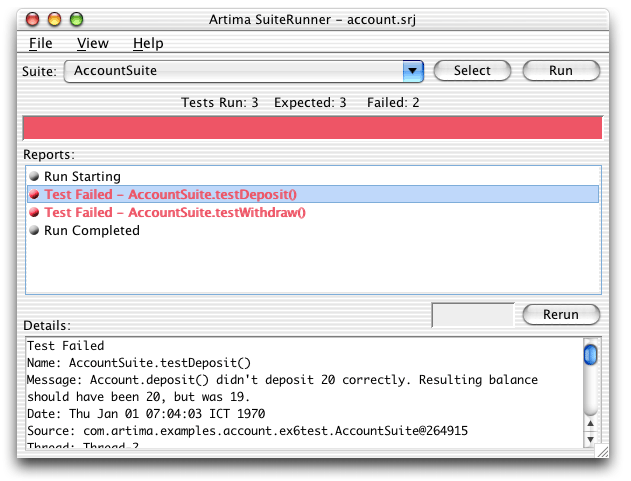
Figure 2. Getting details of a failed test.
Fixing the bug that caused these tests to fail is left as an exercise for you. If you scroll down in the details, you'll find a stack trace of a thrown exception that should help you find and fix the bug. Once you fix the bug and recompile the class or classes you changed, you can simply press the Run button again to see if your fixes have solved the problem.
Figure 3 shows the View menu, which lets you select which kinds of reports you wish to view in the reports list. The GUI begins its life with a default selection of just Runs and Failures. Runs and Failures means that only Run Starting, Test Failed, Suite Aborted, Run Aborted, Run Stopped, or Run Completed reports will appear in the list. Via the View menu, you can individually select which reports you want to see in the reports list, or you can quickly select Runs and Failures or All Reports.
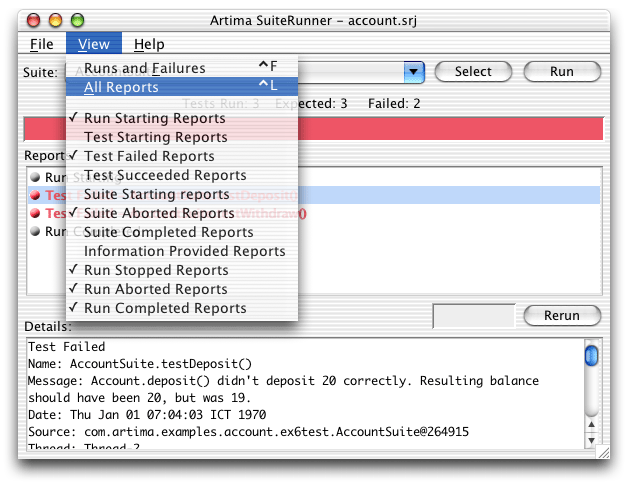
Figure 3. Selecting All Reports from the View Menu.
The result of selecting All Reports in the View menu is shown in Figure 4. As you can see, different kinds of reports are denoted with small ball icons of different colors. Suite Starting and Completed are marked with a cyan icon. Run Starting, Stopped, and Completed are marked with gray icons. Test Starting is purple. Test Succeeded is green. Test Failed, Suite Aborted, and Run Aborted are all red (and the text is red for these report types too).
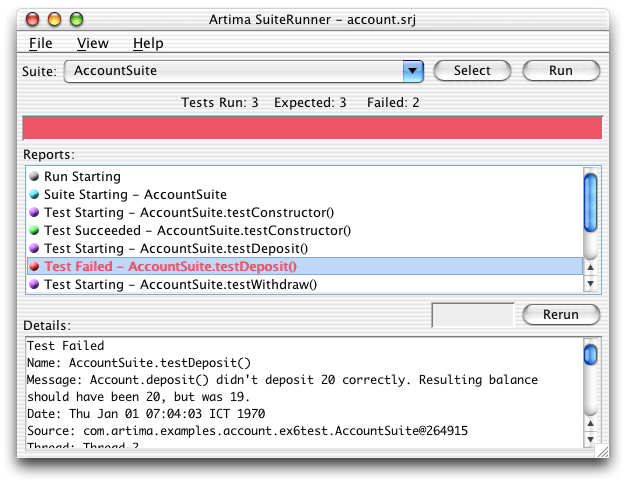
Figure 4. Viewing all reports in the reports list.
Selecting a Different Suite
To run a different Suite, press the select button. The Select a Suite dialog will appear, as shown in Figure 5:
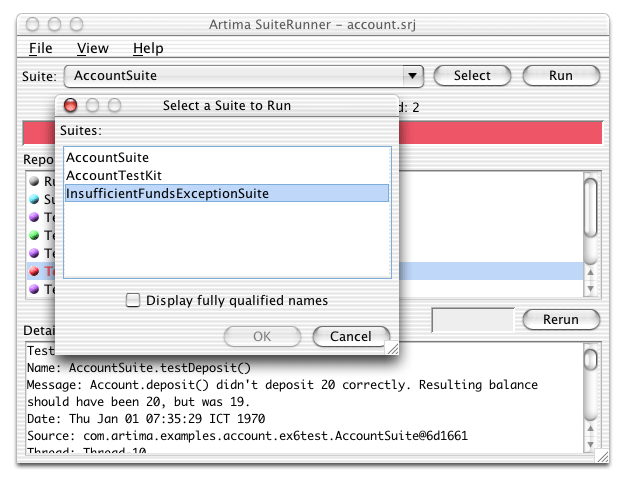
Figure 5. Selecting from the suite selector dialog.
The Select a Suite dialog searches the runpath and class path for any classes that subclass class Suite, and displays their names. If you select a name and press OK (or double click on a name), that Suite will appear in the Suite combo box and be immediately executed. Figure 6 shows the result of selecting InsufficientFundsExceptionSuite from the Select a Suite dialog:
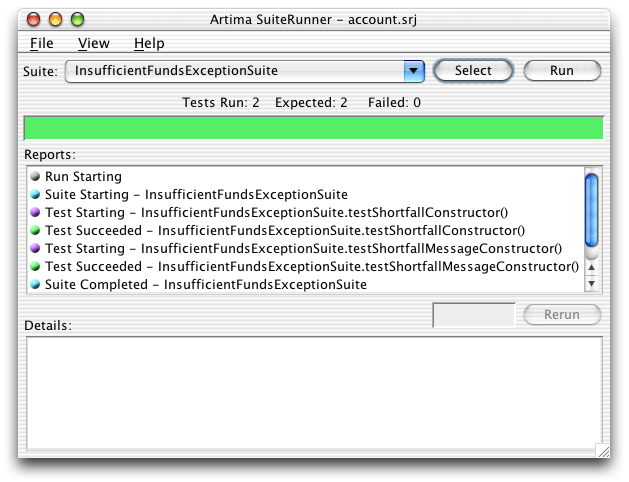
Figure 6. InsufficientFundsExceptionSuite succeeds.
Green is good. It means that all the tests ran without throwing TestFailedException or any other exception.
Selecting a Suite from the History List
The Suite combo box stores a history of the most recent five executed suites of tests. Since you've now run two different suites, you can use the combo box to go back and run the original suite, AccountSuite. Simply click on the combo box's down arrow and select AccountSuite. That suite will now appear in the main combo box text area and be executed immediately.
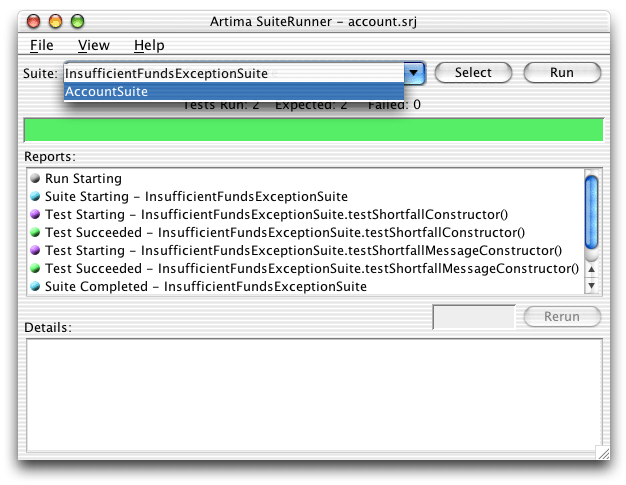
Figure 7. Selecting a suite from the combo box's history list.
Figure 8 shows the result of selecting AccountSuite from the Suite combo box's history list:
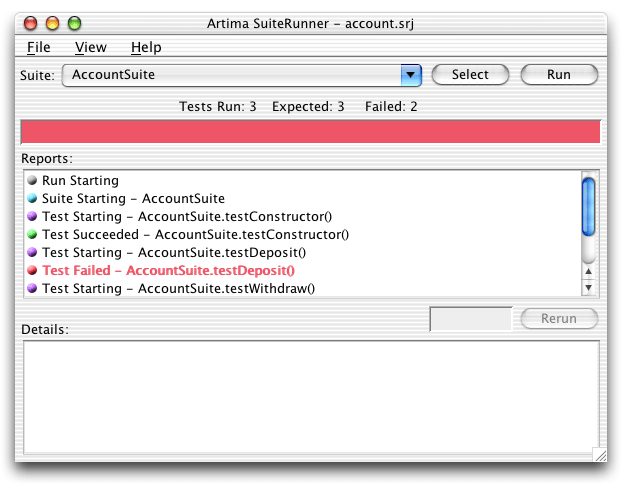
Figure 8. Running AccountSuite from the combo box's history list.
Editing the Recipe
As shown in Figure 9, the File menu allows you to create a new empty recipe, open a different recipe file, save changes to the current recipe, save the current recipe in a new file, and edit the current recipe:
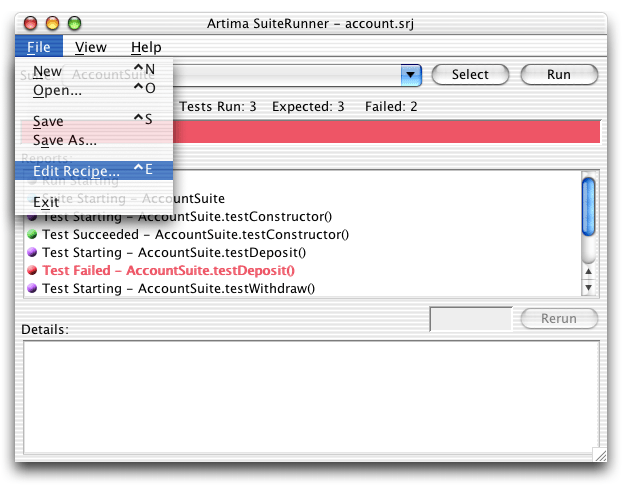
Figure 9. Selecting Edit Recipe from the File menu.
Figure 10 shows the results of selecting Edit Recipe in the File menu, then clicking on the Runpath Tab. A recipe consists of a set of suites, a runpath, and a set of reporters. Any of these three items can be empty for a particular recipe, though unless you have at least one suite and one reporter specified you won't be able to run a test. Figure 10 shows that the runpath consists of one item, the example directory:
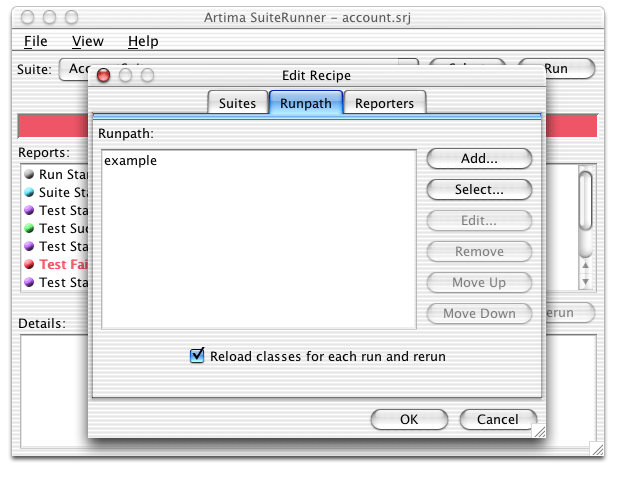
Figure 10. Selecting the Runpath tab in the Edit Recipe dialog.
Running JUnit Test Cases
In addition to the three Suites—AccountSuite, AccountTestKit, and InsufficientFundsExceptionSuite—the example directory contains three JUnit test cases. To run these test cases you must include junit.jar in the runpath. The Artima SuiteRunner distribution ZIP file does not include junit.jar. If you don't already have JUnit, you can download it from junit.org.
Pressing the select button on the runpath tab pops up a file selector. As Figure 11 shows, junit.jar is currently highlighted:
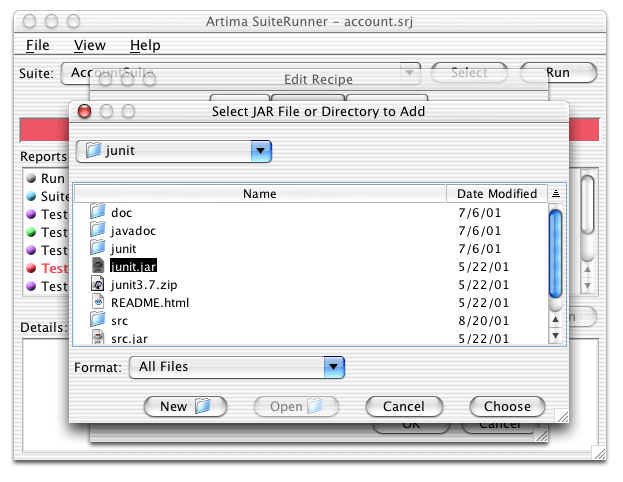
Figure 11. Adding junit.jar to the runpath.
Pushing OK in the file selector selects the currently highlighted file or directory and adds it to the end of the runpath. Figure 12 shows that junit.jar is now in the runpath:

Figure 12. junit.jar is now in the runpath.
Pressing OK on the Edit Recipe dialog accepts the changes to the recipe. Now that junit.jar is on the runpath, the Select a Suite dialog discovers the JUnit test cases, as shown in Figure 13:

Figure 13. Suite selector now discovers JUnit test cases too.
Selecting AccountJUnitTestSuite in the Select a Suite dialog causes that class, a JUnit TestCase, to appear in the Suite combo box and be immediately executed.

Figure 14. Running a JUnit test case.
Creating a new Recipe File
Now that you have changed the recipe to include junit.jar in the runpath, and specified AccountJUnitTestSuite as the suite to run, you can save that recipe in a new file to reuse later. To save the current recipe in a new file, select Save As from the File menu.
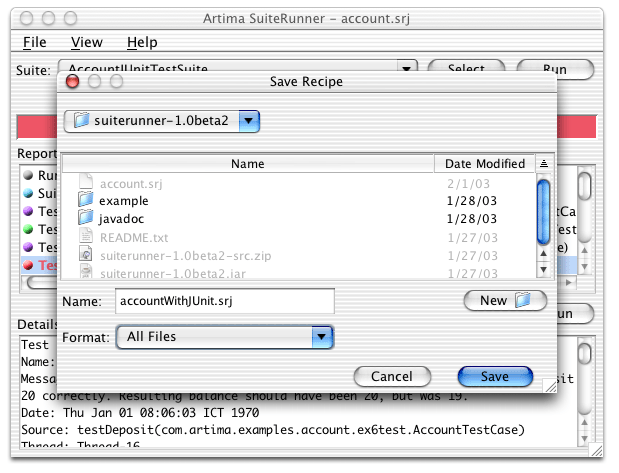
Figure 15. Creating a new recipe file.
If you save the current recipe as accountWithJUnit.srj, it will look like:
org.suiterunner.Runpath=-p "example /Users/bv/nobkp/junit/junit.jar"
org.suiterunner.Suites=-s com.artima.examples.account.ex6test.AccountJUnitTestSuite
org.suiterunner.Reporters=-g
Note the difference between this and the original account.srj recipe file is that junit.jar is included on the runpath in addition to the examples directory, and the Suites property lists AccountJUnitTestSuite as the suite to run instead of AccountSuite. By saving the current recipe as a file, you can easily rerun the current test by specifying the recipe file on the command line when you start Artima SuiteRunner, or opening the recipe file from the GUI's File Open menu.
Summary
This article gives an introduction to the basic usage of Artima SuiteRunner, but does not cover all the ways you can use it. To find out more about how Artima SuiteRunner can help you create and run unit and conformance tests, please see the Artima SuiteRunner Tutorial.
Get Help in the SuiteRunner Forum
For help with Artima SuiteRunner, please post to the SuiteRunner Forum.
Resources
JUnit is available at:
http://www.junit.org
Why We Refactored JUnit
http://www.artima.com/suiterunner/why.html
Artima SuiteRunner Tutorial, Building Conformance and Unit Tests with Artima SuiteRunner:
http://www.artima.com/suiterunner/tutorial.html
Runnning JUnit Tests with Artima SuiteRunner, how to use Artima SuiteRunner as a JUnit runner to run your existing JUnit test suites:
http://www.artima.com/suiterunner/junit.html
Create an XML Reporter for Your Unit Tests, how to create a customer reporter for Artima SuiteRunner that formats unit test results in XML:
http://www.artima.com/suiterunner/xmlreporter.html
Artima SuiteRunner home page:
http://www.artima.com/suiterunner/index.html
Artima SuiteRunner download page (You must log onto Artima.com to download the release):
http://www.artima.com/suiterunner/download.jsp
The SuiteRunner Forum:
http://www.artima.com/forums/forum.jsp?forum=61
Talk back!
Have an opinion? Be the first to post a comment about this article.
About the author
Bill Venners is president of Artima Software, Inc. and editor-in-chief of Artima.com. He is author of the book, Inside the Java Virtual Machine, a programmer-oriented survey of the Java platform's architecture and internals. His popular columns in JavaWorld magazine covered Java internals, object-oriented design, and Jini. Bill has been active in the Jini Community since its inception. He led the Jini Community's ServiceUI project that produced the ServiceUI API. The ServiceUI became the de facto standard way to associate user interfaces to Jini services, and was the first Jini community standard approved via the Jini Decision Process. Bill also serves as an elected member of the Jini Community's initial Technical Oversight Committee (TOC), and in this role helped to define the governance process for the community. He currently devotes most of his energy to building Artima.com into an ever more useful resource for developers.
Artima provides consulting and training services to help you make the most of Scala, reactive
and functional programming, enterprise systems, big data, and testing.
2070 N Broadway Unit 305
Walnut Creek CA 94597
USA
(925) 918-1769 (Phone)