|
|
|
|
|
Sponsored Link •
|
|
Advertisement
|
Summary
Conformance tests are an important aspect of publicly specified APIs. Unit tests are an effective way to improve software robustness. In this tutorial, Bill Venners shows you how to use Artima Testkit to help you build conformance and unit tests for Java-based projects.
Note: This article is unfinished and unedited. I am posting it in this form to give a bit of help to anyone who wishes to try out the 1.0alpha3 early access release of Artima Testkit. I hope to have a finished, edited version ready within the next few weeks. Please consider this an early access release of the article.
To get you up and running quickly, the Artima Testkit 1.0alpha3 distribution ZIP file
includes a simple example. The source and class files for the example are found
in the example directory. A recipe file that runs the example
is contained in account.x.
To run the example, simply unzip the 1.0alpha3 distribution ZIP file in a directory, and type any of following commands from that directory. To run the example via the executable JAR file, use the following command:
java -jar testkit-1.0alpha3.jar -p example -s com.artima.examples.account.ex6test.AccountTestKit
The -p example portion of the previous command specifies a runpath with a single
directory, example. The -s com.artima.examples.account.ex6test.AccountTestKit portion
indicates Testkit should load the specified class, a subclass of com.artima.testkit.Suite,
and invoke its execute method. Because no reporter is explicitly mentioned on the command line,
Testkit will display its graphical user interface (GUI) and show the
results of the run there.
To run the example using the executable JAR and the recipe files, type:
java -jar testkit-1.0alpha3.jar account.x
Here are the contents of recipe file account.x:
com.artima.testkit.Runpath=-p "example"
com.artima.testkit.Suites=-s com.artima.examples.account.ex6test.AccountTestKit
com.artima.testkit.Reporters=-g
The recipe file specifies the same runpath and suite as the previous command line, but
with the com.artima.testkit.Reporters=-g property
indicates explicitly that a single graphic reporter should be used.
As a result, this command has the same effect as the previous command.
Testkit will create a URLClassLoader for the runpath that will
load classes from the example directory. Via the URLClassLoader,
Testkit will load the AccountTestKit class, a subclass of com.artima.testkit.Suite,
and invoke its execute method.
If you are the kind of person who likes to put everything on the class path, you could also run the example using the following command:
java -classpath testkit-1.0alpha3.jar:example com.artima.testkit.Runner -s com.artima.examples.account.ex6test.AccountTestKit
java -classpath testkit-1.0alpha3.jar;example com.artima.testkit.Runner -s com.artima.examples.account.ex6test.AccountTestKit
In this command, the testkit JAR file and the examples directory are both placed on the the classpath, so no runpath
is necessary. Testkit will be able to load and execute the AccountTestKit class via the class path
class loader, the same class loader that loads com.artima.testkit.Runner itself.
Lastly, you could specify the Testkit JAR file on the class path, but specify the example directory via
the runpath, as in:
java -classpath testkit-1.0alpha3.jar com.artima.testkit.Runner -p example -s com.artima.examples.account.ex6test.AccountTestKit
This command, because it includes a runpath, will cause Testkit to create a URLClassLoader to load
classes from the example directory mentioned in the runpath.
When using the GUI, you will likely want to use a runpath to specify the location of the classes being
tested and the test classes (i.e., the subclasses of com.artima.testkit.Suite). The GUI
allows you to select an option that will cause Testkit to create a new runpath URLClassLoader
for each run. This option enables you to run a test, inspect the results, change your software to fix failed tests, compile
your fixes, and run the test again without restarting Testkit. But the reload option is only available for
classes loaded via the runpath class loader. Any classes loaded via the class path class loader cannot be reloaded
before each run.
As of the 1.0alpha3 release, Artima Testkit has been tested on Mac OS X, Windows XP, and Solaris. The following description shows screenshots of the GUI as it appears on Mac OS X. If you use the command that requires the least typing to run the example,...
java -jar testkit-1.0alpha3.jar account.x
...you should see something like this:
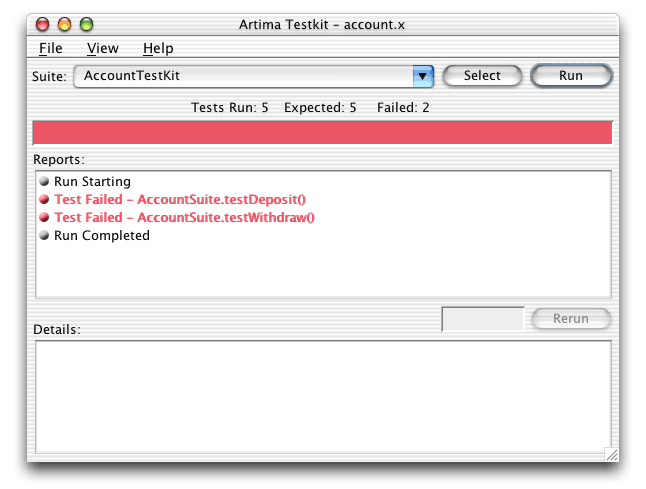
Artima Testkit's main GUI is comprised of:
The glaring red progress bar seen in Figure 3 indicates that
some insidious bug or bugs in the account example caused two tests to fail.
To find out more about a report, select the item in the Reports list. Details of that report
will show up in the Details text area:
Fixing the bug that caused these tests to fail is left as an exercise for you.
If you scroll down in the details, you'll find a stack trace of a thrown exception that should help you find
and fix the bug. Once you fix the bug and recompile the class or classes you changed, you can simply press
the Run button again to see if your fixes have solved the problem.
Figure 5 shows the View menu, which lets you select which kinds of reports you wish to view
in the reports list. The GUI begins its life with a default selection of just Runs and Failures. Runs
and Failures means that only Run Starting, Test Failed, Suite Aborted, Run Aborted, Run Stopped, or
Run Completed reports will appear in the list. Via the View menu, you can individually select which
reports you want to see in the reports list, or you can quickly select Runs and Failures or
All Reports.
The result of selecting All Reports in the View menu is shown in Figure 6. As you can see, different
kinds of reports are denoted with small ball icons of different colors. Suite Starting and Completed
are marked with a cyan icon. Run Starting, Stopped, and Completed are marked with gray icons. Test
Starting is purple. Test Succeeded is green. Test Failed, Suite Aborted, and Run Aborted are all red
(and the text is red for these report types too).
To run a different
The Select a Suite dialog searches the runpath and class path for any classes that subclass
class
Green is good. It means that all the tests ran without throwing
The Suite combo box stores a history of the most recent five executed suites of tests. Since you've
now run two different suites, you can use the combo box to go back and run the original suite,
Figure 10 shows the result of selecting
As shown in Figure 11, the File menu allows you to create a new empty recipe, open a different recipe file,
save changes to the current recipe, save the current recipe in a new file, and edit
the current recipe:
Figure 12 shows the results of selecting Edit Recipe in the File menu, then clicking on the
Runpath Tab. A recipe consists of a set of suites, a runpath, and a set of reporters. Any
of these three items can be empty for a particular recipe, though unless you have at least
one suite and one reporter specified you won't be able to run a test. Figure 12 shows that
the runpath consists of one item, the
In addition to the three
Pushing OK in the file selector selects the currently highlighted file or directory and
adds it to the end of the runpath. Figure 14 shows that junit.jar is now in the runpath:
Pressing OK on the Edit Recipe dialog accepts the changes to the recipe. Now that junit.jar is
on the runpath, the Select a Suite dialog now discoveres the JUnit test cases, as shown in
Figure 15:
Selecting
Now that you have changed the recipe to include junit.jar in the runpath, and specify
If you save the current recipe as
Note the difference between this and the original
Suites (or JUnit TestCases) available on the runpath and class path.
Debugging a Failed Test

Figure 4. Getting details of a failed test.
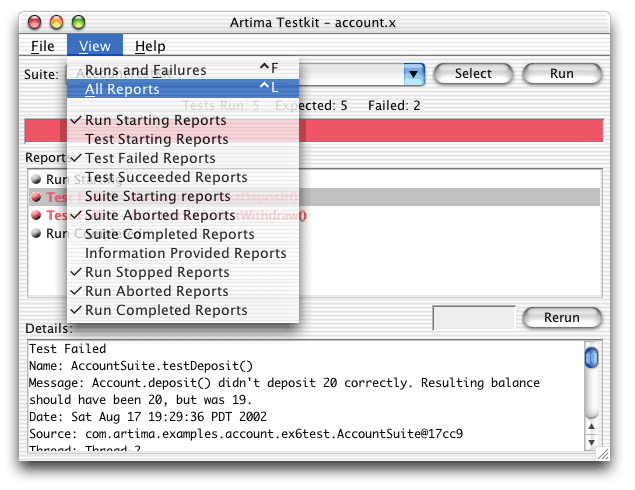
Figure 5. Selecting All Reports from the View Menu.
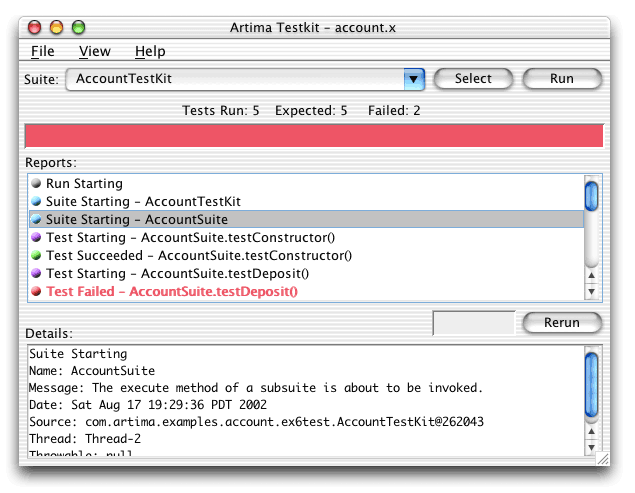
Figure 6. Viewing all reports in the reports list.
Selecting a Different Suite
Suite, press the select button. The Select a Suite dialog will
appear, as shown in Figure 7:
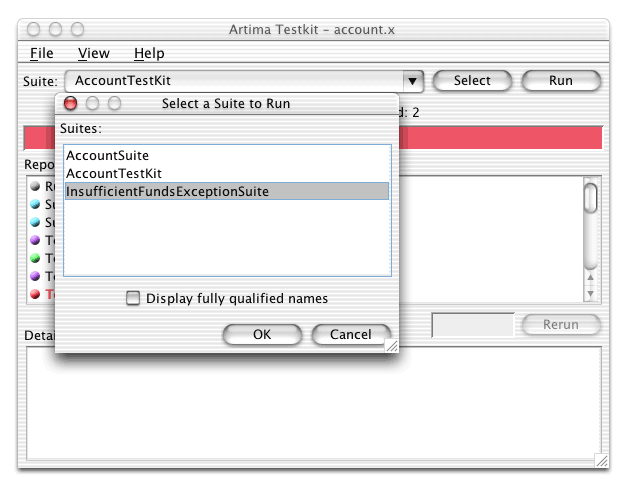
Figure 7. Selecting from the suite selector dialog.
Suite, and displays their names. If you select a name and press OK (or
double click on a name), that Suite will appear in the Suite combo box and be
immediately executed. Figure 8 shows the result of selecting InsufficientFundsExceptionSuite
from the Select a Suite dialog:

Figure 8. InsufficientFundsExceptionSuite succeeds.
TestFailedException or any other exception.
Selecting a Suite from the History List
AccountTestKit. Simply click on the combo box's down arrow and select
AccountTestKit. That suite will now appear in the main combo box text area and will
be executed immediately.
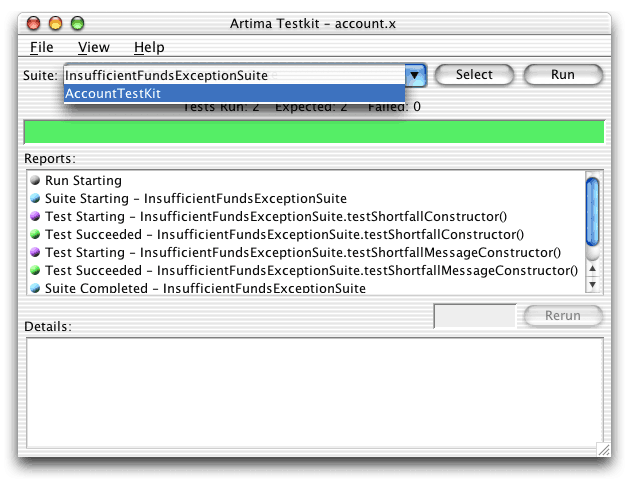
Figure 9. Selecting a suite from the combo box's history list.
AccountTestKit from the Suite combo box's history
list:
Figure 10. Running AccountTestKit from the combo box's history list.
Editing the Recipe
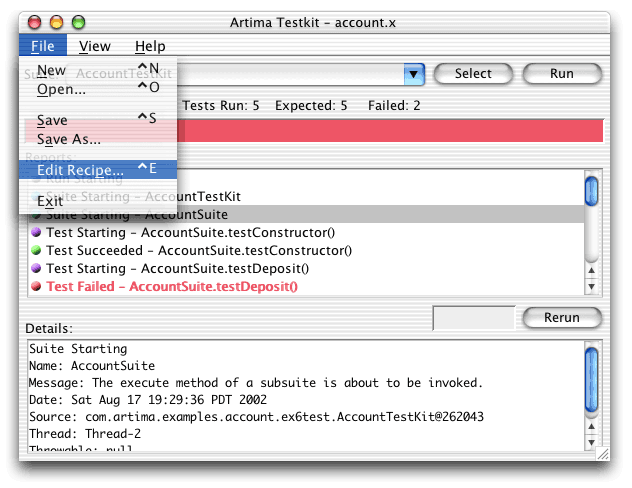
Figure 11. Selecting Edit Recipe from the File menu.
example directory:
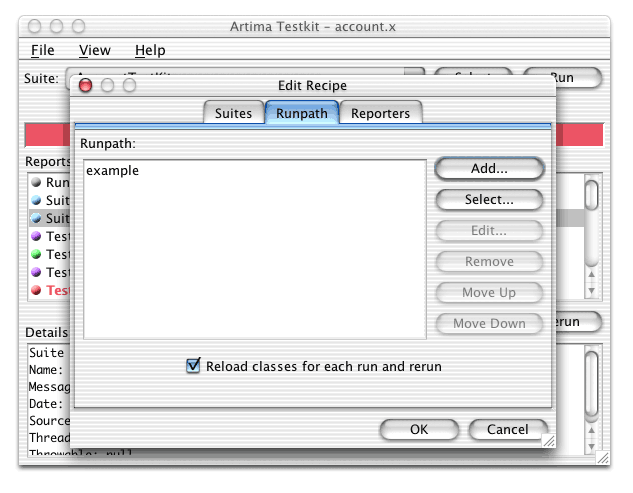
Figure 12. Selecting the Runpath tab in the Edit Recipe dialog.
Running JUnit Test Cases
Suites (AccountTestKit,
AccountSuite, and InsufficientFundsExceptionSuite), the example
directory contains three JUnit test cases. To run these test cases you must include
junit.jar in the runpath. (Or, if you run Artima Testkit from the class path, you could
place junit.jar on the class path.) Pressing the select button on the runpath tab pops up
a file selector. As Figure 13 shows, junit.jar is currently highlighted:
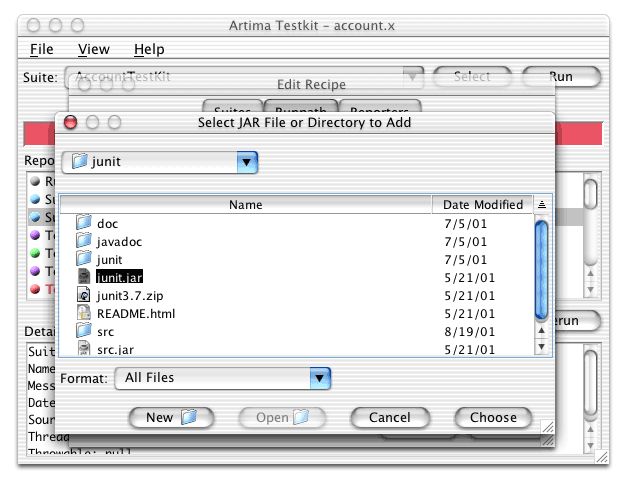
Figure 13. Adding junit.jar to the runpath.
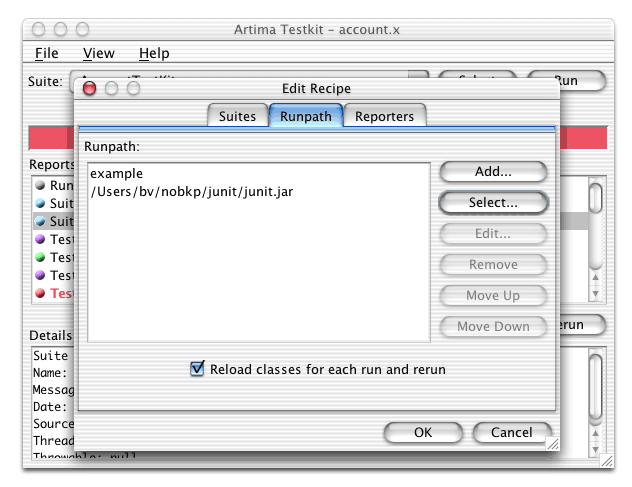
Figure 14. junit.jar is now in the runpath.
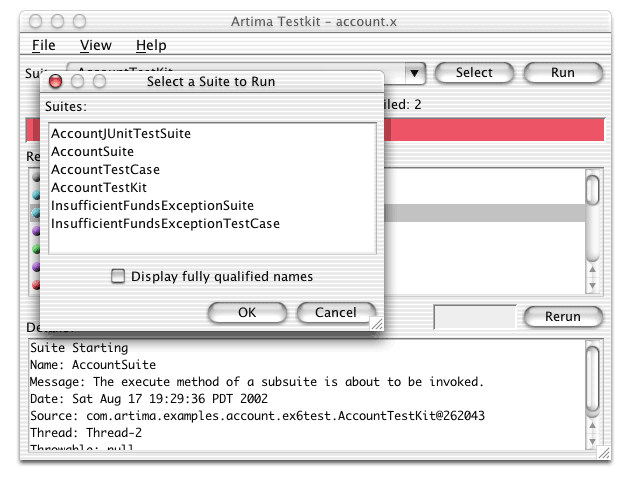
Figure 15. Suite selector now discovers JUnit test cases too.
AccountJUnitTestSuite in the Select a Suite dialog causes that
class, a JUnit TestCase, to appear in the Suite combo box and be immediately
executed.
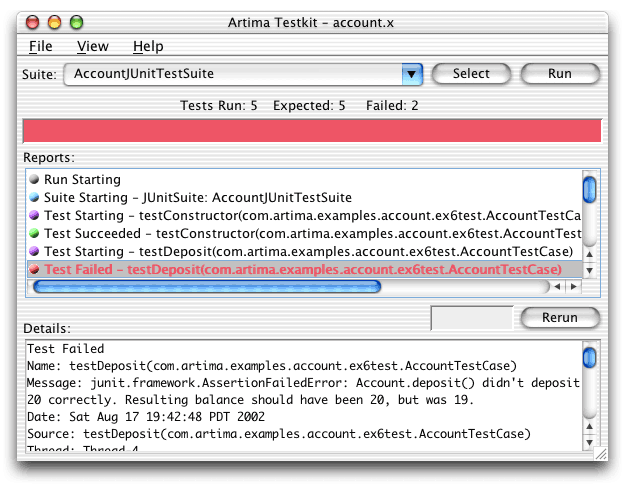
Figure 16. Running a JUnit test case.
Creating a new Recipe File
AccountJUnitTestSuite as the suite to run, you can save that recipe in
a new file to reuse later. To save the current recipe in a new file, select Save As from
the File menu.

Figure 17. Creating a new recipe file.
accounJUnit.x, it will look like:
com.artima.testkit.Runpath=-p "example /Users/bv/nobkp/junit/junit.jar"
com.artima.testkit.Suites=-s com.artima.examples.account.ex6test.AccountJUnitTestSuite
com.artima.testkit.Reporters=-g
account.x recipe file is
that juni.jar is included on the runpath in addition to the examples directory, and the
Suites property lists AccounJUnitTestSuite as the suite to run
instead of AccountTestKit.
Summary
Resources
http://www.junit.org
http://www.artima.com/testkit/ohboy.html
http://www.artima.com/index.html
http://www.artima.com/testkit/download.jsp
http://www.artima.com/forums/forum.jsp?forum=61
|
Sponsored Links
|